Showing posts with label tatted collar. Show all posts

Tuesday, 19 April 2022

Medallion Collar Finished! ...And Antique Pattern Library

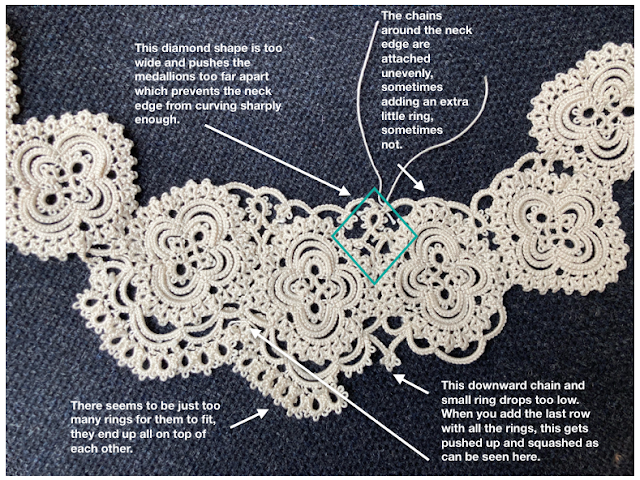
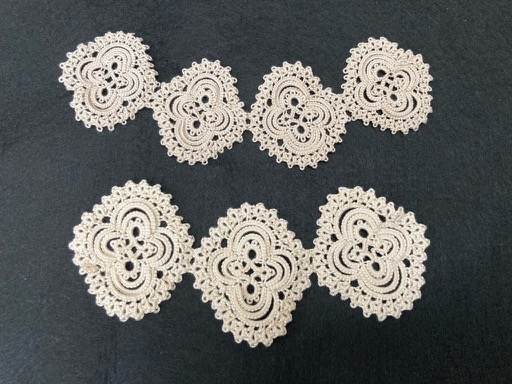
It's done!  I'm so pleased to have finally made this collar.  I modified the first round of the neckline to avoid having to make all those separate diamond-shaped pieces between medallions (as I had discussed in a previous blogpost) and also because I couldn't make them fit right for me.  I used a SCMR with a smaller ring thrown off it to fill the gap instead and incorporated it into the first round of the neck edge which simplifies things a lot.


Now I need to find a way to wear it!  I'm thinking I'd like to make a shirt or a dress from it so that the collar is not just added on top of something but is part of the garment.  I need to give it some thought.


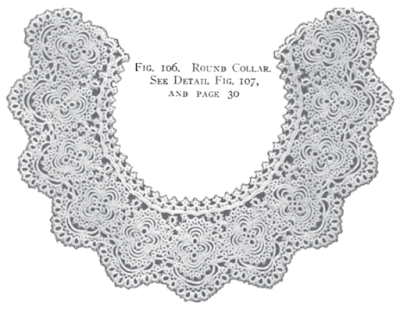
And as we're on the topic of vintage patterns, I wondered if any of you had seen the Antique Pattern Library website?  They have several vintage tatting publications available online.  I need to explore it more.  Here is the link should anyone be interested: Antique Pattern Library

If anyone would like to make the collar, I have a filmed a series of videos that show how to tat it from start to finish.

Best wishes,
Frivole

Saturday, 9 April 2022

More Medallion Collar

After the final round of the bottom edge of the collar, I had to figure out the neck edge and firstly the two pieces added on at the ends of the collar.  I debated whether to find a way to incorporate those two pieces into the subsequent rounds rather than having to do them separately and cut and tie for each but in the end, I kept them, again because I want to respect the original as much as possible.

However, I didn't like the way it felt a bit "unfinished" to me.  So I added an extra ring and an extra chain to fill what looked like a gap on my collar.

Please ignore all the messiness around the neck edge where I've been testing different options but if you look just at the two ends:  on the left is exactly as per the pattern and on the right is my modified version where I've added an extra ring and an extra chain.  I could have maybe added two extra chains... but that's what I went with for now.  Probably if I was making this again I would do the double chain to keep more consistent with the rest of the design where all the chains are doubled on the bottom edge of the collar.  But I suppose I was trying to add the minimum possible!


Just three more rounds and the collar will be done!

Best wishes,
Frivole

Saturday, 2 April 2022

Think I found it!

Yes, I think I found the way I'm going to make that final round on the bottom edge of the collar.  I wanted to stay as close as possible to the original so I kept the arrangement of three small rings in the space between the scallops but I joined them differently, especially as I had removed the small ring that would have been there from the previous round.  So we're now making three new small rings to fill the space between the scallops.


As you can see, it's definitely not the same but I hope you'll feel I'm keeping close enough to the spirit of the original.

Part of the problem I was finding, if you look at the photo below, was how to move between those two rings without having a fairly long piece of thread carried on the back.  My guess is that there is a piece of thread carried on the back and I think you can see part of it on the top side of the left little ring (where the left arrow points).  That's the thing when working with just one shuttle, you can't make a chain to take you to the next point if needed, you can only carry the thread so you want to avoid having large spaces to cross (I hope that makes sense what I'm saying).  I'd love to be able to examine the back of the original collar!


Photo of original collar from Priscilla Tatting Book No. 2


You can see on the photo below where I have tried tatting the last round as it is written: the mirrored piece is pushed under and I have put the carried thread on top so you can see where it has to travel from and to.  I couldn't see any other way to make that join between the three rings without having that long carried thread which would be on the back.


By making the three small rings on the same round (as per my modification) you only have to carry the thread a short distance between each picot.  I have to say that I do like the look of the mirrored ring and chains that were used in the original but I tried and tried and just couldn't make that part fit nicely for me.

That third round is now making the collar curve and I think it's going to look great!  


Right!  I now need to figure out how to make the neck edge of the collar. 

More testing!

Best wishes,
Frivole

Wednesday, 30 March 2022

Medallion Collar Continued

It's taken me quite a lot of time and testing so far and I'm still not sure I've found a solution I'm completely happy with!  That corner area between the medallions is proving tricky!  The other complication is that you're working with just one shuttle on the last round where you are making all the rings which means you can only move from one place to the next by carrying the thread over (can't make chains).  I'm looking for a solution that looks as close as possible to the original, which looks good of course, and executable with one shuttle only!


I've still decided to go with the first two rounds with a small modification and eventually cut all my testing bits so I could film the next part.  Back to just the medallions:


If you're interested in tackling this collar, you can find the videos in this playlist.

And here's where I'm at now:


A bit more testing for the next round required but hopefully I'll come to a solution soon.

Best wishes,
Frivole

Monday, 21 March 2022

Many Problems!

Even before I've completed all the medallions, I decided to start testing the other rows to make sense of the pattern and see how everything fits together.  The piece you're seeing therefore is messy as it's all just testing:  there's knots and loose threads and different elements that I've tried out so it looks disorganised at the moment.  But once I've figured out what I'm doing, I will cut it all out and start again.

Yes, there are many problems with this pattern!  As can often be the case with vintage patterns, I just cannot make things fit as per the way the pattern is written.  If I try to follow just as is indicated, elements end up all crammed in in places but mostly, the collar just won't curve as it should.  If I make the neck edge as written, the curve is practically non existent, you'd end up with an edging rather than a collar.

I don't really know what's so different as I feel that my medallions look pretty much like the ones in the photo in the book... so why can't I get everything else to fit around them?


I'm determined to make this work though, even if it will mean adjusting the pattern so that I end up with the right shape and with all elements fitting well with each other.

The finished collar will therefore not be exactly like the one in the book - I feel the changes will be mostly around the neckline - but it will still look close to the original.

Examining it again, I think that my medallions are perhaps tighter/smaller than the ones in the book which would affect all the elements around... but still I don't see that it should cause that many problems.

I'll keep at it!

Best wishes,
Frivole

Friday, 11 March 2022

Minimal Progress

A while ago I showed you the start of a collar (more info on it in this blogpost).  I was making it in size 20 thread but the book calls for size 10 and I eventually decided to start again with the right size thread after all.  I don't often choose to work with the thicker thread as I find the movements don't flow quite as well for me as with finer thread.

As you can see I'd not got very far anyway so it wasn't too much of a heartbreak to start again and you can see how considerably larger the motifs are in size 10 compared to the size 20 ones.


I'm excited about this collar and continue to be frustrated that I can still only do a bit of tatting at a time (tendonitis how I dislike thee!) but like the tortoise, I'll get there eventually.  

I'm wondering about making some YouTube videos about this collar since I'll be working on it for a while, what do you think?

I'm adding the photo of the collar again so you can see what I'm working towards if you'd not seen it before.  It's from Priscilla Tatting No. 2 Book which can be found online here.


Best wishes,
Frivole