Wednesday 31 July 2013

Pretty Beaded Flower

I get side-tracked easily... but that's what I love about tatting!  There seems to be an endless source of inspiration at our fingertips.  So this post doesn't follow on from the previous as I had planned but is about something different altogether.

I saw this flower on In Tatters, done by Sarah Wood and I followed the link.

It took me to Corina Meyfeldt's blog which I hadn't seen before.  She has lots of other pretty things on there, worth a visit.  And here is the link to the pattern:  Beaded Flower Pattern.

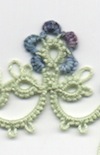
I really like the way she used beads in this, it does give the flower a lovely shape.  Four-bead picots are not new but I'd not seen a join done into the beaded picot like this before.  Great idea.


The green one below is done with the stitch count as per the pattern.  In the pink one above, I changed it a bit (smaller petals).  And I think I prefer a smaller stitch difference between the first and second round on the petals (as in the pink).  Both a pretty though.  I do notice that her white flower with same stitch count as my green looks more like my pink flower... ??


The smaller blue one is done in Altin Basak 50 and there are also even fewer stitches in that one.


A great little pattern and an interesting use of beads, thanks to Corina for sharing her ideas.

Best wishes,
Frivole

Monday 29 July 2013

Abandoned Idea

I worked on these some time ago... but they never made it to pattern.  I had them hanging by my worktable and just looked at them again and thought perhaps I should re-visit.


These are just samples, quickly tatted, with mistakes in them, knots, etc.  I was playing with lock chains at the time and the pattern that I eventually came up with was Minuet... or maybe that was after Minuet, I can't remember for certain.


There was an interesting problem that came up with this design:  I wanted a split ring to climb from one round to the next but I had two different colours (it's the green rings near the centre) but of course, I wanted the split ring to be all green, not one half green and one half pink!  So I came up with the idea of tatting the second half with two shuttles which worked great - as you can see in the motif above, all the rings are green though one of them is a split ring and one shuttle has pink in it and the other green.  

Now I fear I didn't take any notes on this (or on the design itself) so I think I will sit and give this some thought and try to work out how I did it before!  

I will be reporting back.

Best wishes,
Frivole

Friday 26 July 2013

Record Time Edging

I even surprised myself by how quickly I finished this!  And that includes at least 6-8 times where I got it wrong (it was getting ridiculous), had to cut and re-start.  For some strange reason, I kept forgetting to do the bottom large rings in pairs!  I don't know, I think I had a mental block about it.  So in spite of that, this edging did work up pretty fast.


As well as adding blue to the spray, I decided to do a yellow pin stitch around the edge of the handkerchief before attaching the lace.  I thought it would pull it all together more.


Yep, I'm happy with that.


Best wishes,
Frivole

Wednesday 24 July 2013

Improvise, Adapt, and Overcome

One of my favourite sayings.  I regularly say it to the children.  When you don't have what is needed, it means it's time to get creative.

I went into town this morning to try to find a handkerchief with blue in it because I did it the other way around and started the edging without getting the hanky first!  I failed.  Came home.  In my stash, I had this hanky with a yellow embroidered spray on it.  I liked it.  At a pinch, it even worked with the blue edging as it was.


But then I thought if I just added a bit of the blue from the edging into the spray... it would be even better!  So I added a few blue buds and one tiny rose.  I may add just a bit more yet but I'll contemplate for a while before I decide.  There's some buds with the yellow ones on the right too but you can't see them very well on the photo.


What do you think?  Will it work?


I'm motoring on with this and have just one and a half sides left to tat.  I'll still keep an eye out if I find a better matched hanky but there are not many places that sell them around here.

Best wishes,
Frivole

Monday 22 July 2013

One Shuttle Edging

I've said this before... but I do find a one-shuttle edging to be relaxing.  No need to ever wind back onto the shuttle, you can just tat away and gently ease more thread from your shuttle as you go.
Aaaah!  Bliss.

This is not to say that I don't also enjoy more challenging patterns (you know I like those too!) but it makes a nice, pleasant change to tat a one-shuttle edging.  And they work up faster too as you're not wasting any time winding and unwinding.

I've done something I hate though:  I printed this off the internet and I forgot to put the information of where I go it from.  The title is "Pizzo a punte con una navetta sola".  If someone has seen this and could point me in the right direction, I'd really appreciate it.

That was quick, Crazy Mom Tats already found me the link to the pattern, here it is:  Pizzo a Punte

And here is where I got to so far:


Saying that about relaxing though...  I managed to make quite a few mistakes in this and had to cut and re-start on four occasions!  I don't know what it is... something about the way the rings are connected on different picots and I kept forgetting to tat the bottom rings in pairs...  Never mind, I think I've finally got it registered and I'm away.


Looking at the photo on the pattern, I did keep my bare threads a bit shorter and definitely shorter than the 2cm that is called for in the directions (I even wonder if that's a typo because 2cm would be way too long).

I'll be slowing down in the workshop now as the children finished school on Friday.  We're having some very hot weather in the UK at the moment and they say it's going to last for a while yet... oh, for a swimming pool... now that would be nice...

Best wishes,
Frivole


Friday 19 July 2013

Draw Results

It's Friday evening.  Getting a bit late even.
Taking out the extras, I ended up with 41 entries.


I'm glad I wasn't "picking" seeing how Jane and Crazy Mom Tats were arguing!  Lucky for me but sadly for them though, I let the random generator do its work and their numbers didn't come up... :-(

Pattern is on its way to the three winners.

Best wishes,
Frivole

Thursday 18 July 2013

Mille-Fleurs pattern ready - and a Draw!

I know Forget-Me-(K)not was a very strong contender so I hope I won't disappoint too many of you but I went with a French name again.  Mille-Fleurs just really appealed to me and although I kept swapping the names around, in the end, Mille-Fleurs won.


As I mentioned before, I did things slightly differently in this pattern so I provided a lot of pictures to make sure it was all clear and there is also a video available that shows how to make the petals.


Thank you very much to my testers who gave me lots of good feedback!


I'm going to have a draw to win copies of this pattern.  There will be three winners.  If you'd like to be entered, please leave a comment on this post.  I will make the draw on Friday evening (UK time).

Best wishes,
Frivole

Saturday 13 July 2013

... And The Idea Took Shape


This is the idea that occurred to me when I made the little red sample from the previous post.  Once it started trotting in my head, I couldn't leave it alone!


I tried different colour combinations.
Above is a variegated green with a solid pink.


Below is black and cream
(this one looks prettier in real life,
I'm going to work on that one again)

And next I reversed it
and used a solid green with a variegated for the petals


With this stitch count, the border has a tendency to curve around a bit which give it great flexibility of use as it will go around a square, an oval or a round centre (like my recent Viola pattern).  But I am working on the stitch count so that it will sit straight also (there will be more than one version for this again).  It already sits straight easily with only very light help but I want to make a version which is "naturally" straight.


You can also make the centre of the flowers
the same as the petals for a different look:

This would work nicely with another variegated so there
is still some contrast between the centre and the petals
(I need to tat yet more samples!)


And it also makes a really pretty medallion.


Now there is a lot going on in this pattern although it may appear simple at first.  New methods of doing things I've come up with for this design.  The petals are done in a way I've never seen before.  I like how this technique makes pretty little "puffy" petals.  It brings an extra textural interest to the tatting.  The colour changes are made WITHOUT a shoe-lace trick which works surprisingly well.  It's going to take a little while to write up the pattern as it will need lots of explanations and photos I think.

Now for a name... ?  Hoping inspiration will strike any moment soon... but if anyone has suggestions, I would gladly receive them.


P.S.  I'm good for test-tatters already but thank you for offering!

Best wishes,
Frivole

Thursday 11 July 2013

Strawberries

I love the perfume of fresh strawberries... don't you?  Today I found some really gorgeous, flavourful ones and bought many punnets.  I'd had this idea, after making elderflower cordial, that a strawberry syrup would be lovely.  I looked it up.  Found a recipe.


Doesn't that look irresistible?


So here it is,
my first batch of
Strawberry Syrup


It did feel a bit tragic to use up all those beautiful strawberries in a syrup but I have loads left over to eat fresh as well.  I think a bit of that drizzled over ice cream would be heavenly, with some fresh ones too of course.  What about with pancakes?

Don't have much to show for in the tatting department though...  here is a very small sample I worked on yesterday, sorry it's a bit wonky!  But... it's given me ideas...


... to be continued.

Best wishes,
Frivole

Friday 5 July 2013

Crafter's Motif

I was going to call this "Middia's Motif - Take Two"... but in fact, I find that Occasional Crafter's version is so different as to be practically a new motif altogether!


This wouldn't have closed at all after only six repeats so the eight were necessary.  I unfortunately made a mess of the last SCMR but hopefully it's not overly obvious!

I also added a couple of stitches to the chains to give the motif a bit more "breathing space".  I think my tension must be a bit tighter than Crafter's as the six stitches called for definitely felt too short!   I also wondered if it wouldn't be better to join the flowers at the second and penultimate petals instead of the first and last...  I think I'll have to try that next.

Here's the original again, as reference,
and so you can see how different the two are.


The sun is shining at last and it definitely feels like summer today!  This enabled me to collect some more elderflower and I have another batch infusing as I write this.  I was delighted with the nice response to my previous blogpost about making cordial.  Thanks for writing everyone!

Best wishes,
Frivole

Thursday 4 July 2013

Tatting... and Elderflower Cordial

This blog is mostly about tatting... but I can talk about other stuff sometimes, can I?  One of the small things that make me happy in life is making blackberry jam from the hedgerows in the autumn and elderflower cordial at this time of year.  I like making other jams and chutneys too but there is something special about making something so delicious out of freely available fruits and flowers that grow around us.  Don't you think?  Elderflowers and blackberries grow wild in the hedges all around the lanes.  This particular batch of elderflower happens to come straight from my garden as there is also some growing in our hedges.

I love how it looks when you put all the flowers and the lemons in a big bowl.  

And the scent!  

Wonderful.


And here is the finished product.
There were a couple more bottles but one's already nearly gone
(my children love it!)
and the other is in the fridge.


Elderflower Cordial is delicious mixed
with sparkling mineral water
and poured over ice cubes.

Ah!  Makes me thirsty!

Sunshine in a bottle,
a wonderful summer drink.


And the tatting part in this post?  Well, I think it's going to have to be just the mat that the bottles are standing on.  I shall be collecting more elderflowers and making more cordial in the next few days.  The flowers don't last for long, must make the most of it!

Best wishes,
Frivole

Tuesday 2 July 2013

Middia's Motif

I saw this on Occasional Crafter's Blog.  Isn't it pretty how she combined the motif with embroidery?  I liked it so much that I followed the link to Middia's pattern who does absolutely beautiful and perfectly executed cro-tatting.

But frankly, mine didn't turn out right!
Or rather, it didn't turn out looking the same as Occasional Crafter's at any rate...


I notice that on hers, the shape below the central rings is different, as if she'd done a SCMR although the pattern just shows a chain, a ring, then a chain again.  She does say that she left out the stitch between the petals of the flowers which means that her flower is closed at the bottom whereas mine is open, as in the pattern. I think I'll have to try it again.  I wonder also that tension must be different with shuttles vs needle and perhaps that made a difference too?  This worked out way too tight on the outside round, it needed quite a bit of pressing to stay flat!

As for the butterfly doily, I made a few more repeats and then noticed that, on that also, the outside round was feeling a bit too tight.  Debating whether to cut my losses now, chop off the bit already done and start again on the last round with a few more stitches added in...

Best wishes,
Frivole