Wednesday, 10 August 2016

This is the reason...

... why I bought the Persson and Blomqvist book in the first place.  I had seen this doily in a few places and I fancied making it one day.  So after Ice Crystal, I thought I'd tackle it.

This is Lucky Clover.  The beginning of it at any rate.


Now I must tell you that when I first completed this last night, I doubted whether it would turn out right; it was cupping so badly!  I'm not sure my photo came out too well, but the motif was really a bowl!


However, after pinning and light pressing, to my surprise, all was resolved.


These are really long chains to keep straight!  Chains naturally want to curve...
So you have to loosen your tension just a bit to prevent them from curving too much.


Now on to round two...


Best wishes,
Frivole

Sunday, 7 August 2016

Lovely Lavender and the Wheels Again

We were tidying a lavender bush and mother-in-law had cut some of the flowers and was throwing them away!  No, no, no, I had a much better idea:  I made her a little crochet lavender sachet.  I'm away from home at the moment so didn't have my stash of wool/cotton to choose from so all I had was this minty yarn.  Made two quick circles with double stitches, crocheted them together on the next round, leaving a small gap to fill it with the lavender, finished crocheting them together and then completed with a decorative edge.  Instant gratification.  I have enough to make a second one which will go in my own drawer.


I did also work a bit more on the tatted wheels.  You know these are very simple but at the same time deceptively difficult to do well!  My first one was a bit tight and this meant the rings were pulled out of shape when I pressed the wheel slightly at the end.  So next time I thought I'd make a slightly longer joining picot between rings and changed the stitch count by one stitch.  And now?...  it frills!  On the next one I would need to adjust the joining picot ever so slightly and that's what I mean:  it's quite hard to get the spacing just right with the bare threads and the joining picots.

So yes, simple, but not quite that simple!


It does flatten easily with a little pressing but I'd like to get it just right.
At least on the second version (on the right)
the rings have their nice teardrop shape and the bare threads
look better too.  They were a bit distorted on the first version.


The other problem with these little wheels is what to do with the ends and how to finish it.  It's much harder to finish neatly when you are working with bare threads.  How about you, how do you complete the last ring with its bare thread?  There is no chain to hide into.  I ended up putting two magic loops in the first small ring and hiding both ends into it but you need to actually knot the last end before pulling it with the magic loop otherwise it would fall apart too easily.  Am I missing something, do you have a better solution?


Best wishes,
Frivole

Monday, 1 August 2016

Eye of the Sun & Traditional Tatted Wheels

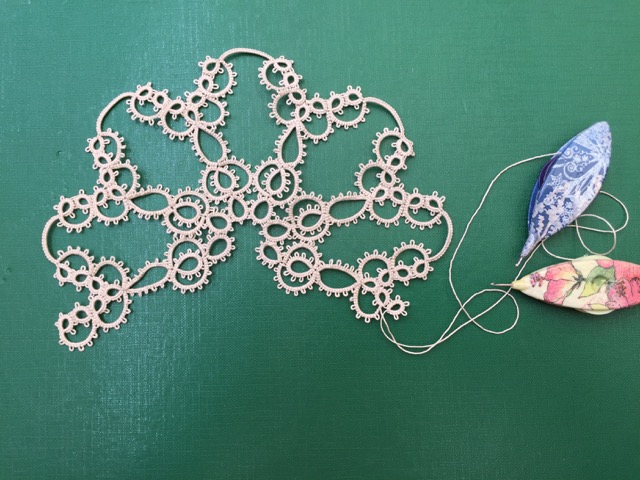
I decided to continue exploring the book "Tatting Patterns and Designs" by Blomqvist and Persson.   I started making Coppelia, a small doily I really like the look of... but the rings are really large: 5 picots separated by 6 stitches and I was not enjoying it.  I may try to make a scaled down version of it.  Instead, I made one of the wheels called Eye of the Sun.  This is a very traditional design which can be found in many tatting books.  


What's interesting is that in old books, the centre ring is always tatted separately after which they say to cut and tie.  Nowadays though, there are different ways to tackle this design and thankfully, there is definitely no need to cut and tie after the centre ring!

This brings me to this post by Tat-a-Renda which had caught my eye... The ring-on-ring method (like a loop-tatted ring) that Jon describes is not for the faint-hearted!  I can do loop-tatted rings and have used them in one of my snowflake designs but I think they may be a bit daunting to many tatters... although this method really enables you to tat the wheel in one go with only one shuttle.

But there are other ways:  you can also tat the centre ring and then use a split ring to move to the next round.  You would only need a second shuttle to make the split ring and then the rest of the wheel is tatted with one shuttle only.  

Or you could also start this motif with the first ring of the second round and make it as a self-closing mock ring which means you could then throw the centre ring off this SCMR.  You would also temporarily need two shuttles to do this but after closing the SCMR, the second shuttle can be removed and the motif completed with one shuttle only.  You would use your full shuttle as the core thread for the SCMR and just wind a bit of thread on another shuttle, just enough to complete the SCMR.


And if you put two magic loops in that first SCMR, you can pull both ends into that first ring after tying them and your wheel is completed and ends hidden.

Which way would be your preferred way to tat this design?  I'm curious to know what's the most popular option!

And finally, I'm making another blanket.  I couldn't help myself.  We're on holiday at the moment and I have other blankets on the go at home but they are too big to bring with me so they stay at home when I travel but I just felt the need to make a simple blanket, just one colour (a dark green that my mother-in-law will like).  The design is Victorian Lattice Square by Destany Wymore which can be found free on Revelry.  I think it's a very pretty design which looks effective in one colour.  I now have 12 squares done.  


I hope you are all enjoying summer!


Best wishes,
Frivole

Friday, 29 July 2016

Ice Crystal

Here it is completed.  A great design by Blomqvist and Persson that is tatted in one pass. I'm such a fan of one pass designs!  Very clever. 

The chains that link the centre medallion to the outer diamond shapes have to be straighter than their natural curve which means there is some tension there and those chains do not lie perfectly but apart from that I'm pretty happy with it. 

If I was making it again, I might try to tat the bottom joining chain between repeats the other way (as in the pattern) instead of reversed as I chose to make them. I still think it needs a bit of adjustment in that area and it would be worth remaking. 

Best wishes,
Frivole

Tuesday, 26 July 2016

Much Better!

Robin was right:  I was not reading the pattern properly.  That's because it's written in a rather unusual way; instead of numbering picots, it numbers segments between picots so I was making one too many picots (and extras stitches) in several places!  In the end I actually stopped reading the written pattern and just referred to the photo for the right number of picots and where to join them.

I still kept my chain reversed the other way between repeats and I added just a few more stitches to it to give a bit more space between repeats.  I think it will work out this time.


It's now lying flat and the shape is good and it looks like the eight repeats will fit just right.  I look forward to starting on the second round and I do love the fact that it will be continuous!

Thanks again for your helpful comments.

Best wishes,
Frivole

Sunday, 24 July 2016

Making Progress but...

You ladies are wonderful!!  Your comments on the previous post were really helpful.  Of course, as soon as you explained it made sense.


BUT... and it's a big but, though the pattern now makes sense, I'm finding it's not fitting properly.  I reversed the linking chain (between repeats) because I found there was a lot of tension on that chain which was distorting it (and you can see that on some of the ice crystal doilies I've looked at on internet) as well as on the photo that accompanies the pattern.  But I'm finding that there is not enough space between repeats which means that after four repeats, I still do not have a semi-circle and therefore I won't be able to close the circle when I reach 8 repeats.  I don't know where I'm going wrong!  

It doesn't look too bad on the photo below after 5 repeats but it's not lying flat at all!  It's "cupping" badly.  And see where the linking chain is?  Imagine that chain curving the other way, it would end up being on top of or under the two chains either side.


I ended up cutting the connecting chains to see how it would naturally lie and this is the gap between repeats that I'm getting.  What should I do?  It must be me since I've seen many of those doilies and they seem to fit fine after 8 repeats.  Am I missing something?


Looks to me like I'd have space for an extra design element between the repeats.... but that can't be right.


The other thing I have found is that there are lots of discrepancies between the photo and the written pattern.  Many joins are not indicated on the pattern although they appear to be made on the photo and in the pattern, some rings have 6 picots and others have 5 although on the photo, all rings seem to have 5 picots.  Same problem with the chains!  

I have tried to look up the thread about this doily on Craftree that someone mentioned but have not located it so far.

Still... I won't be defeated!  Many people have successfully tatted this doily.  Surely I can do it too!

Best wishes
Frivole

Friday, 22 July 2016

Stuck!

Hi all!  Not doing too well on the tatting front at the moment...  I've tried a few different things but nothing's working out too well.  I decided to make a blogpost anyway, in spite of not having much to show you, since it's been so long already since I last blogged.

I thought I'd tackle something new today but I quickly got stuck!  A bit unusual for me but this pattern from Blomqvist and Persson has very few indications on how to work the design and I've looked and looked and am not sure at all where to go from here...


Anybody else has made this pattern by any chance?  I was hoping the whole thing was worked in one pass but now I don't think it's possible and I can't even figure out how to complete this first repeat!

Oh dear!


I will leave it for tonight and look at it afresh in the morning.  I hope I can figure it out because I rather like the look of this design.

How is everyone doing?  Last day of school for our youngest today so summer holidays really start now.  I hope the sun is shining where you are!

Best wishes,
Frivole