Wednesday, 27 September 2017

About Josephine Knots...

I've been making lots of Josephine knots as I was working on this new pattern.  I wasn't happy with the way they were lying...  I really wanted a perfectly round shape that sat neatly on top of the chain.

So I tried different things:

I'm posting this image really big so you can see all the detail.  From left to right, here is what I did:

1. Josephine Knot done with the first half of a double stitch (10 halves). When I was first making JKs, I used the first half of the double stitch repeated.  For some reason it took me ages to try it with the second half instead!  Anyway, the first half is much more difficult to work with, causing lots of twisting and making it difficult to achieve a nice looking, regular JK.  So second half is definitely the way to go (I bet you knew that already!).  But just to show you, the first JK is done with first halves.

2. Josephine Knot done with the second half of a double stitch (10 halves).  A much smoother, rounder looking JK.  But the last half stitch twists towards the back too much I find and it appears to lean left.

3. JK done with second half of the double stitch but adding a full stitch at the beginning and at the end (1ds, 8 halves, 1 ds).  Yes, that's better.

4. KJ done with second half of the double stitch and just an extra first half of a double stitch added at the end (10 second halves + 1 first half).  Trying to prevent twisting again but that didn't do the trick.

5 and 6. JK done with second half of the double stitch but before closing the ring, pass your shuttle through the ring from front to back. Yes, that did it.  Passing the shuttle through from front to back means that the thread now exits the back of your ring so the next stitches pull slightly on the thread and help bring the stitches in line for a much more round and full looking JK. 

I'm happy with those last two versions and that's the way I'll be making my JKs in future.  Here is the new pattern I'm working on with lots of JKs!  It's evolved quite a bit from the very first version but I felt the centre was too crowded and the whole thing was quite tight with three rounds so I opened up the centre and changed the second round a bit.  Any good?  Criticism welcome!


I'm still giving it some thought, trying to get spacing between the chains more even, I'm adjusting that on the next sample.  I'm also not too happy with the split ring I used to make this a one pass design.  It ends up having a strange shape and I wish I could find a better way.  I really don't want to cut and tie and make this two rounds.  Can I live with a slightly strange shaped small ring?  I don't know.  I'm sure you can spot which one it is?  It's the one to the left of the top point.  Oh!  I got it!  I was just re-reading myself before publishing this blogpost and looking at the photo above, I just found where I need to start so that I won't have the problem of the misshapen ring.  Quick, I'll tat the next sample and post again.  


The photo below shows some of the gradual evolution:


Best wishes,
Frivole

Friday, 22 September 2017

Earrings and New Snowflake?

I'd forgotten how much I like these layered flowers.  I made several at some point and then forgot about the pattern.  I wanted to make some new earrings for my daughter so I made her a pair in green:


Idea from Edwige Renaudin's Book "La Frivolité aux Navettes"


I might change the size of the rings slightly on the next pair as there are three rows but the middle row is lost a bit so I'll try adjusting the number of stitches just a bit.

And I found a snowflake design I'd been working on a while back and which I never finished to my satisfaction.  I decided to have another stab at it.  I think the shape is interesting but it's still not quite right... and I want to find a way of working it continuously, in one pass.  At the moment, I can't link the 2nd to the 3rd round without a break.  I'll keep working at it.


Best wishes,
Frivole

Sunday, 17 September 2017

A Bit More Giant Tatting, Needle Lace, and Gifts from the Garden

I had another go with a different yarn.  The blue one from the previous post was a cotton yarn where the strands were quite loose and it was easy to catch the strands with the hook when trying to close the rings.  This time I used a thick wool yarn in aran weight and a 5mm crochet hook and it was much easier to work.


You can't see in the photo but I actually drilled a hole in the bottom of my hook (pictured in photo) so that I could use it like a tatting needle and thread my yarn through it at the bottom.  I tried like that and I tried the cro-tatting way but I preferred the look at the bottom of the rings when made the cro-tatting way and then there is also the great advantage of working from the ball too.  Except I've not yet figured out how to make "tatted" chains that way so the chains are actually crocheted.  You can see how large this tatting is compared with the tatted leaf in the middle which is made in size 20 thread.

Anyway, I don't know if I'm going anywhere with this.  Perhaps that's it for now and it was just interesting to try very large tatting.  I think it could be interesting to tat a shawl or something like that but I'd have to practice some more to get more even rings because at the moment, it's not satisfactory to me!

Then I saw a video on YouTube that caught my eye and I had to give something new a try.  It's a bit of needle lace...

The bottom motif is my first attempt (rather wonky!) and the green one is my second attempt (already much better).  It was interesting to make and it looks pretty.  Some of the edgings I've seen done with this technique are really lovely.


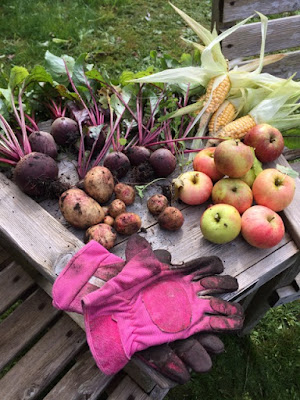
And lastly, just a photo from my garden.  We had a go at growing a few vegetables this summer with very mixed results.  Tomatoes and green beans were a bit of a disaster but this weekend we dug up some potatoes and beetroot which are very nice, a few stunted ears of corn (not a huge success) and we also collected the remainder of the apples from our trees (we have two).  The photo shows some of what we collected and I just thought the fruit and veg looked appealing in the sunshine...


Best wishes,
Frivole

Thursday, 14 September 2017

Giant Tatting, Miniature Knitting and More Socks

Just been having a bit of fun with a few things lately.  A friend of mine showed me some amazing miniature sweaters so I gave tiny knitting a try with some pins and tatting cotton.  It's not difficult to knit in that size really, the only thing that's difficult is finding a way of holding on to the needles!  What you'd need is a needle that is fine but much longer so you could grasp it.  After that I saw some big tatting somewhere and went on the search for a set of japanese crochet-tatting needles I'd got a few years ago and which were gathering dust in a drawer.

I added the tatting shuttle in there to give you an idea of scale.  As you can see my cro-tatting skills are still leaving much to be desired!


Blowing the next image up so you can see how small the knitting is!


I'm still finding it really hard to make a neat job of needle tatting though not doubt it's just a matter of practice.  I kind of like the idea of oversized tatting though and I think (if I can get my technique up to scratch) it could be nice to make a bold necklace in a thicker yarn.  I might give it another try.  

And then I also have more socks on my needles which will be gifts.  A pair of fun, extremely fluffy ones with cookie monster eyes for a young person:


And another pair in my current favourite sock yarn (Cascade Heritage) with nice fine cabling, a pattern by Wendy Johnson.


That's it for now.  Tonight I'm working on the green doily.  I'm over a third of the way around the last round so just more of what you've already seen.  That's the problem with big projects isn't it.  You feel like you don't have anything new to show for a while.


Autumn is definitely in the air already.  It's been cool, wet and windy!

Best wishes,
Frivole

Saturday, 2 September 2017

Basket Case!

We did have some fun with our basket making!  I'm back now but was a bit sorry to have to leave my unfinished last project behind... for the next holiday.  I'm definitely keen to make some more baskets at some point (and even try some different kinds).  These coiled baskets are really easy though and anyone could have a go at making them.  They are inexpensive as you don't need to buy any materials (apart from some string maybe but any cheap natural fibre string would work - well, it doesn't even need to be natural fibre of course, but I just think it's nicer to go with the dry grass and the whole theme of it.).

After the first larger basket, I decided I wanted to make one with a lid.  This time I used a different, finer linen string to make it.


I decorated the lid with real acorns and some crochet oak leaves.
I loved the tiny one I found which I drilled
with a fine drill bit so I could attach it.


After the lidded one, I decided to try using raffia as my 
tying/covering media and completely covered the dry grass.
I looks really nice and makes for a more "professional" looking basket
which is smooth and tight.

The only thing with rafia is that the lengths are shorter
so you need to refill your needle and join more often.
Raffia is a natural fibre which is also inexpensive.
It's really thin but really strong.
I had never worked with raffia before and I like it.


I asked my son to make me yet another needle for this project,
one that was flatter to be more easily inserted between the tight coils.

He made it out of elder (the others were all made of oak) and it works
a treat.  Sadly it eventually broke but he promised to make me another one.


Here are the various needles he made for us:


And lastly, a photo of our collective first effort
at basket making - there are even more unfinished items
that I didn't show in the photo.


I made a couple of videos on this which I will upload over the course of the next couple of weeks.  I really enjoyed this holiday activity with my children.

I hope you all had a nice time too.  Can't believe it's September already!  Time to buy new school shoes and get back to the routine.  

Best wishes,
Frivole